Checking Linux Version
lsb_release -a
Checking 32 Bit (or) 64 Bit Operating System
getconf LONG_BIT
Updating System Packages
yum install update
Disabled SELinux in /etc/sysconfig/selinux
vim /etc/sysconfig/selinux
SELINUX=disabled
Installation of EPL Repository
wget http://dl.fedoraproject.org/pub/epel/6/x86_64/epel-release-6-8.noarch.rpm
Installation of Packages & Dependencies
yum install mc wget crontabs vixie-cron make gcc libtool-ltdl curl mysql-server mysql-devel net-snmp net-snmp-utils php php-mysql php-mcrypt php-gd php-snmp php-process ntp sendmail sendmail-cf alpine mutt
Server Install 32 bit glibc
yum install glibc.i386 libgcc_s.so.1
Download & Install Liberary Files
32 Bit Files
wget http://www.dmasoftlab.com/cont/download/libltdl3_1.5.24-1ubuntu1_i386.deb
wget http://www.dmasoftlab.com/cont/download/libltdl3-dev_1.5.24-1ubuntu1_i386.deb
dpkg -i libltdl3_1.5.24-1ubuntu1_i386.deb
dpkg -i libltdl3-dev_1.5.24-1ubuntu1_i386.deb
64 Bit Files
wget http://dmasoftlab.com/cont/download/libltdl3_1.5.26-1ubuntu1_amd64.deb
wget http://dmasoftlab.com/cont/download/libltdl3-dev_1.5.26-1ubuntu1_amd64.deb
dpkg -i libltdl3_1.5.26-1ubuntu1_amd64.deb
dpkg -i libltdl3-dev_1.5.26-1ubuntu1_amd64.deb
Download & Install Ioncube
32 Bit Files
cd /usr/local
wget http://www.dmasoftlab.com/cont/download/ioncube_loaders_lin_x86.tar.gz
tar -xvf ioncube_loaders_lin_x86.tar.gz
cd /ioncube
sudo cp loader-wizard.php /var/www/html
64 Bit Files
cd /usr/local
wget http://www.dmasoftlab.com/cont/download /ioncube_loaders_lin_x86-64.tar.gz
tar -xvf ioncube_loaders_lin_x86-64.tar.gz
cd /ioncube
sudo cp loader-wizard.php /var/www/html
Check PHP Version
php -v
Edit php.ini Configure File & Add Ioncube File extension location
vim /etc/php.ini
zend_extension=/usr/local/ioncube/ioncube_loader_lin_5.3.so
Re-Start httpd Service
service httpd restart
/etc/init.d/httpd restart
Now Check Ioncube Loader file in Web Interface
http://IP-Address/loader-wizard.php
Click on Local Install
Loader Installed (PHP is Working)
Download & Installation Free-Radius
wget http://dmasoftlab.com/cont/download/freeradius-server-2.2.0-dma-patch-2.tar.gz
tar -xvf freeradius-server-2.2.0-dma-patch-2.tar.gz
cd freeradius-server-2.2.0
Configure Freeradius
./configure
make
make install
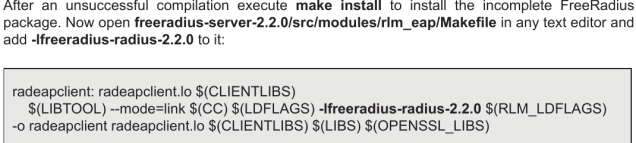
Copy File -lfreeradius-radius-2.2.0 in Makefile
cd src/modules/rlm_eap
vim MakeFile
(LIBTOOL) –mode=link $(CC) $(LDFLAGS) $(RLM_LDFLAGS) -lfreeradius-radius-2.2.0 -o radeapclient radeapclient.lo $(CLIENTLIBS) $(LIBS) $(OPENSSL_LIBS)
Configure Free Radius after Copying File to MakeFile
make
make install
radiusd -X

ldconfig
Testing Free Radius in Terminal
radiusd -X


Setting Permissions
chown apache /usr/local/etc/raddb
chown apache /usr/local/etc/raddb/clients.conf
Creating Mysql Database
mysql -u root -p password
CREATE DATABASE radius;
CREATE DATABASE conntrack;
CREATE USER ‘radius’@’localhost’ IDENTIFIED BY ‘radius123’;
CREATE USER ‘conntrack’@’localhost’ IDENTIFIED BY ‘conn123’;
GRANT ALL ON radius.* TO radius@localhost;
GRANT ALL ON conntrack.* TO conntrack@localhost;
Downloading & Installation Radius Manager 4
Radius Manager 4.0.4
wget http://talhaali.byethost13.com/files/rm_related/radiusmanager-4.0.4.tgz
Radius Manager 4.1.0
wget http://talhaali.byethost13.com/files/rm_related/radiusmanager-4.1.0.tgz
tar -xvf radiusmanager-4.0.4.tgz
tar -xvf radiusmanager-4.1.0.tgz
cd radiusmanager-4.0.4
cd radiusmanager-4.1.0
Setting Permissions
chmod 775 ./install
./install
Select Operating System 1 (Redhat, CentOS, Fedora)

Choose Option Type

Choose Option 1 (New Installation)

Press Enter

Press Enter

Press Enter

Press Enter

Press Enter

Press Enter

Press ‘y’ to Continue

Installation Process is Started
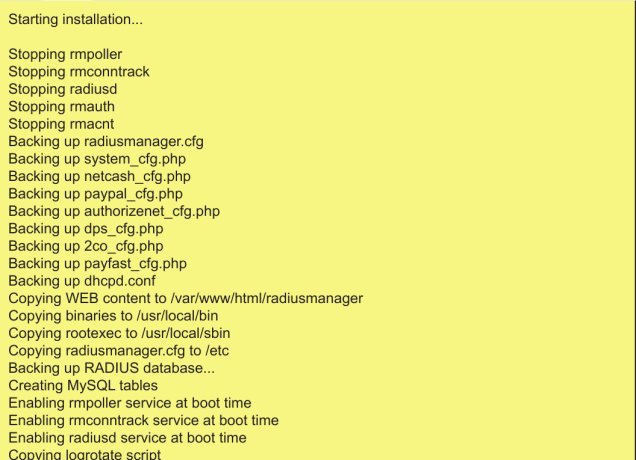
Installation is Completed

Setting Permissions for Binaries
chmod 775 /usr/local/bin/rmauth
chmod 775 /usr/local/bin/rmacant
chmod 775 /usr/local/bin/rmpoller
chmod 775 /usr/local/bin/rmconntrack
Change Permissions & Owner for /etc/radiusmanager.cfg
chmod 600 /etc/radiusmanager.cfg
chown root.root /etc/radiusmanager.cfg
Change Permissions for tmpimages
chown apache /var/www/html/radiusmanager/tmpimages
Copying Licence Files
Copy Lic.txt & Mod.txt Files to /var/www/html/radiusmanager
Re-Starting httpd Service
service httpd restart
Re-Starting Mysql Service
service mysqld restart
Re-Starting Free Radius Service
service radiusd restart
Admin Login Page
http://IP-Address/radiusmanager/admin.php
Username – admin
Password – 1111
![]()
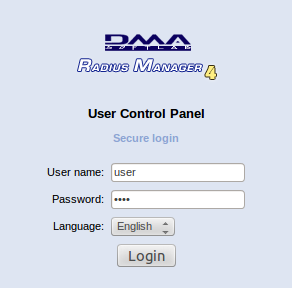
User Login Page
http://IP-Address/radiusmanager/user.php
Username – user
Password – 1111
Checking Linux Version
lsb_release -a
Checking 32 Bit (or) 64 Bit Operating System
getconf LONG_BIT
Updating System Packages
yum install update
Disabled SELinux in /etc/sysconfig/selinux
vim /etc/sysconfig/selinux
SELINUX=disabled
Installation of EPL Repository
wget http://dl.fedoraproject.org/pub/epel/6/x86_64/epel-release-6-8.noarch.rpm
Installation of Packages & Dependencies
yum install mc wget crontabs vixie-cron make gcc libtool-ltdl curl mysql-server mysql-devel net-snmp net-snmp-utils php php-mysql php-mcrypt php-gd php-snmp php-process ntp sendmail sendmail-cf alpine mutt
Server Install 32 bit glibc
yum install glibc.i386 libgcc_s.so.1
Download & Install Liberary Files
32 Bit Files
wget http://www.dmasoftlab.com/cont/download/libltdl3_1.5.24-1ubuntu1_i386.deb
wget http://www.dmasoftlab.com/cont/download/libltdl3-dev_1.5.24-1ubuntu1_i386.deb
dpkg -i libltdl3_1.5.24-1ubuntu1_i386.deb
dpkg -i libltdl3-dev_1.5.24-1ubuntu1_i386.deb
64 Bit Files
wget http://dmasoftlab.com/cont/download/libltdl3_1.5.26-1ubuntu1_amd64.deb
wget http://dmasoftlab.com/cont/download/libltdl3-dev_1.5.26-1ubuntu1_amd64.deb
dpkg -i libltdl3_1.5.26-1ubuntu1_amd64.deb
dpkg -i libltdl3-dev_1.5.26-1ubuntu1_amd64.deb
Download & Install Ioncube
32 Bit Files
cd /usr/local
wget http://www.dmasoftlab.com/cont/download/ioncube_loaders_lin_x86.tar.gz
tar -xvf ioncube_loaders_lin_x86.tar.gz
cd /ioncube
sudo cp loader-wizard.php /var/www/html
64 Bit Files
cd /usr/local
wget http://www.dmasoftlab.com/cont/download /ioncube_loaders_lin_x86-64.tar.gz
tar -xvf ioncube_loaders_lin_x86-64.tar.gz
cd /ioncube
sudo cp loader-wizard.php /var/www/html
Check PHP Version
php -v
Edit php.ini Configure File & Add Ioncube File extension location
vim /etc/php.ini
zend_extension=/usr/local/ioncube/ioncube_loader_lin_5.3.so
Re-Start httpd Service
service httpd restart
/etc/init.d/httpd restart
Now Check Ioncube Loader file in Web Interface
http://IP-Address/loader-wizard.php
Click on Local Install
Loader Installed (PHP is Working)
Download & Installation Free-Radius
wget http://dmasoftlab.com/cont/download/freeradius-server-2.2.0-dma-patch-2.tar.gz
tar -xvf freeradius-server-2.2.0-dma-patch-2.tar.gz
cd freeradius-server-2.2.0
Configure Freeradius
./configure
make
make install
Copy File -lfreeradius-radius-2.2.0 in Makefile
cd src/modules/rlm_eap
vim MakeFile
(LIBTOOL) –mode=link $(CC) $(LDFLAGS) $(RLM_LDFLAGS) -lfreeradius-radius-2.2.0 -o radeapclient radeapclient.lo $(CLIENTLIBS) $(LIBS) $(OPENSSL_LIBS)
Configure Free Radius after Copying File to MakeFile
make
make install
radiusd -X
ldconfig
Testing Free Radius in Terminal
radiusd -X
Setting Permissions
chown apache /usr/local/etc/raddb
chown apache /usr/local/etc/raddb/clients.conf
Creating Mysql Database
mysql -u root -p password
CREATE DATABASE radius;
CREATE DATABASE conntrack;
CREATE USER ‘radius’@’localhost’ IDENTIFIED BY ‘radius123’;
CREATE USER ‘conntrack’@’localhost’ IDENTIFIED BY ‘conn123’;
GRANT ALL ON radius.* TO radius@localhost;
GRANT ALL ON conntrack.* TO conntrack@localhost;
Downloading & Installation Radius Manager 4
Radius Manager 4.0.4
wget http://talhaali.byethost13.com/files/rm_related/radiusmanager-4.0.4.tgz
Radius Manager 4.1.0
wget http://talhaali.byethost13.com/files/rm_related/radiusmanager-4.1.0.tgz
tar -xvf radiusmanager-4.0.4.tgz
tar -xvf radiusmanager-4.1.0.tgz
cd radiusmanager-4.0.4
cd radiusmanager-4.1.0
Setting Permissions
chmod 775 ./install
./install
Select Operating System 1 (Redhat, CentOS, Fedora)
Choose Option Type
Choose Option 1 (New Installation)
Press Enter
Press Enter
Press Enter
Press Enter
Press Enter
Press Enter
Press ‘y’ to Continue
Installation Process is Started
Installation is Completed
Setting Permissions for Binaries
chmod 775 /usr/local/bin/rmauth
chmod 775 /usr/local/bin/rmacant
chmod 775 /usr/local/bin/rmpoller
chmod 775 /usr/local/bin/rmconntrack
Change Permissions & Owner for /etc/radiusmanager.cfg
chmod 600 /etc/radiusmanager.cfg
chown root.root /etc/radiusmanager.cfg
Change Permissions for tmpimages
chown apache /var/www/html/radiusmanager/tmpimages
Copying Licence Files
Copy Lic.txt & Mod.txt Files to /var/www/html/radiusmanager
Re-Starting httpd Service
service httpd restart
Re-Starting Mysql Service
service mysqld restart
Re-Starting Free Radius Service
service radiusd restart
Admin Login Page
http://IP-Address/radiusmanager/admin.php
Username – admin
Password – 1111
![]()
User Login Page
http://IP-Address/radiusmanager/user.php
Username – user
Password – 1111
